
INTRODUCTION
Welcome to part four of the tutorial to make your own CS:GO C4 game prop! In this, the final episode we’re going to be talking about the software that makes it all tick.
This blog post is supplemental to the YouTube video below. For the full tutorial please check out the video and refer back here for the source code and also any corrections or additions that were highlighted after the video was released.
Any questions, please leave a comment below or in the comments of the video.
The Sounds
I know you are itching to dig into the source code but before we do that the first thing we need to talk about are the sounds.
All the sounds that are used in the device are taken from the actual game sounds, each sound being stored on an SD-Card on the “Mp3 pLaYer” (notice the quote marks 😉), and the source code triggers each sound to be played at the appropriate time.
Obtaining the Sounds
Now, I can’t give you all of the sound files to download as they are not mine to give. They are owned by Valve and if I listed them here I’d probably end up on the receiving end of a lawsuit. However seeing as you will be making this as a one off game prop, as a kind of fan art not for commercial resale kind of thing there are ways that you can obtain the sound files that you need and still be able to sleep at night. #NotLegalAdvice
I can give you the countdown beep sound, this one I created myself in FL Studio because the one from the game just didn’t sound right played back on a small speaker. You can download that one in the table below. To obtain all the other sound files, read on…
The way I got the CS:GO C4 sounds was from a YouTube video by Isan Arditama (thanks buddy) which you can find here https://youtu.be/3xSrpsZFI68. It’s a video of all the sounds from CS:GO and what I did was use an online YouTube to MP3 converter to rip the MP3 audio from the video. I can’t link you to an MP3 converter as they seem to come and go, but you should be able to Google one with no problem.
If you can’t get the MP3 from an online converter, another option is to use OBS to record the YouTube video as it plays. Then use VLC Player to convert the MP4 file to MP3. There are loads of tutorials on how to user VLC Player to convert files on YouTube so I won’t go over the process here.
If the video is no longer available on YouTube for any reason you might be able to find another video with the CS:GO sounds, or failing that use OBS to capture the sounds directly from the game yourself and convert the video to MP3 using VLC Player.
Cutting up the sound file
Once you have an MP3 of all the sounds in one big chunk, you will need to cut the MP3 file into separate files, one for each sound you need to be able to play on the device. To do this we will use the awesome (and free) audio editor Audacity.
Load the MP3 file into Audacity and locate one of the sounds that you want to extract.
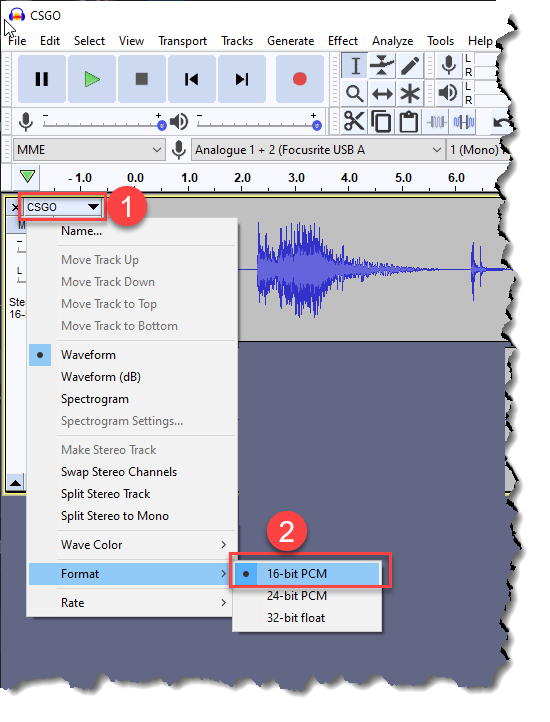
Before you export any sounds make sure the project is mixed from Stereo to Mono.
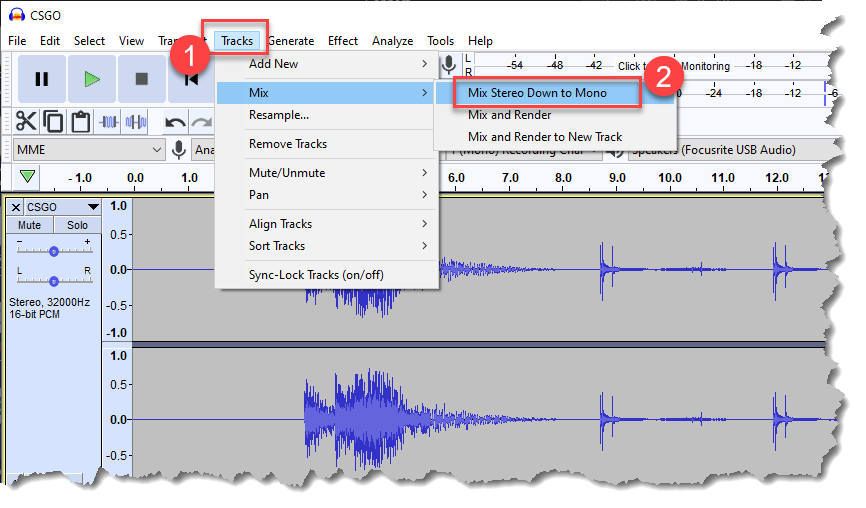
And that the project Format is set to 16 Bit PCM.
The Project Rate (Hz) needs to be 32000.
Click and drag with the left mouse button to select the section of audio that you need and on the File Menu select Export -> Export Selected Audio.
Choose a location to save the file and make sure you’re saving it as a WAV file. The wav files should be named 0000.wav, 0001.wav, 0003.wav etc… Name the wav files according to the table below.
Repeat this to grab every sound that is listed in the table below.
NOTE: BEEP_SOUND (0000.wav) was created by me so you can click on it in the table below to download it.
| Arduino Source Code Sound Name | Game Sound Name | File Name |
|---|---|---|
| BEEP_SOUND (Click to download) | c4_click | 0000.wav |
| TERRORISTS_WIN_SOUND | terwin | 0001.wav |
| KEY_PRESS_SOUND | key_press7 | 0002.wav |
| ABOUT_TO_BLOW_SOUND | nvg_on | 0003.wav |
| TIMES_UP_SOUND | arm_bomb | 0004.wav |
| EXPLODE_SOUND | c4_explode1 | 0005.wav |
| C4_INITIATE_SOUND | c4_initiate | 0006.wav |
| DEFUSING_USA_SOUND | defusingbomb03 (seal) | 0007.wav |
| DEFUSED_SOUND | c4_disarmfinish | 0008.wav |
| DEFUSED_USA_SOUND | bombdef | 0009.wav |
| COUNTER_TERRORISTS_WIN_SOUND | ctwin | 0010.wav |
Remember, you don’t have to use the same sound files that I have, if for example you prefer a different defusing sound from a different faction, go ahead and use that instead.
Converting the files to AD4
I know, painful isn’t it. You’d think that a sound device sold as an “Mp3 pLaYer” would play MP3’s and we wouldn’t have to spend half the tutorial faffing around with sound editing. Now we have to convert the WAV files to AD4 files so that the “Mp3 pLaYer” will play them! 😂
To convert the files to AD4 format you can download the converter here – Download AD4 Converter.
Extract the AD4CONVERTER.EXE file to the same location as the exported WAV files.
Next launch a Command Prompt and set the current directory to wherever you saved the sound files and the AD4 Converter.
Type the following command and press Enter.
AD4CONVERTER.EXE -E4 0000.wav
This will convert 0000.wav to 0000.AD4. Repeat this for every wav file and when done, copy all the .AD4 files to the SD Card and insert it into the “Mp3 pLaYer”.
NOTE: If you have any problems with playback once you have loaded the sound files onto the SD Card it could be that the audio volume level is too high for the device. If so, load up the wav files in Audacity and lower their volume. Re-convert them to AD4 format and try them again. I found I had to lower the volume of the wav files to about -18db to get it to work properly.
We’re now ready for some code!
The Software
The software for this project is in two parts. The first is the source code that will run on the Arduino and will handle the LCD Screen, the Keypad and the sounds etc… And the second is a small Windows Desktop application named the CS:GO C4 Configurator that can talk to the CS:GO C4 Prop over USB in order to be able to set the time for the clock and also the LCD backlight levels.
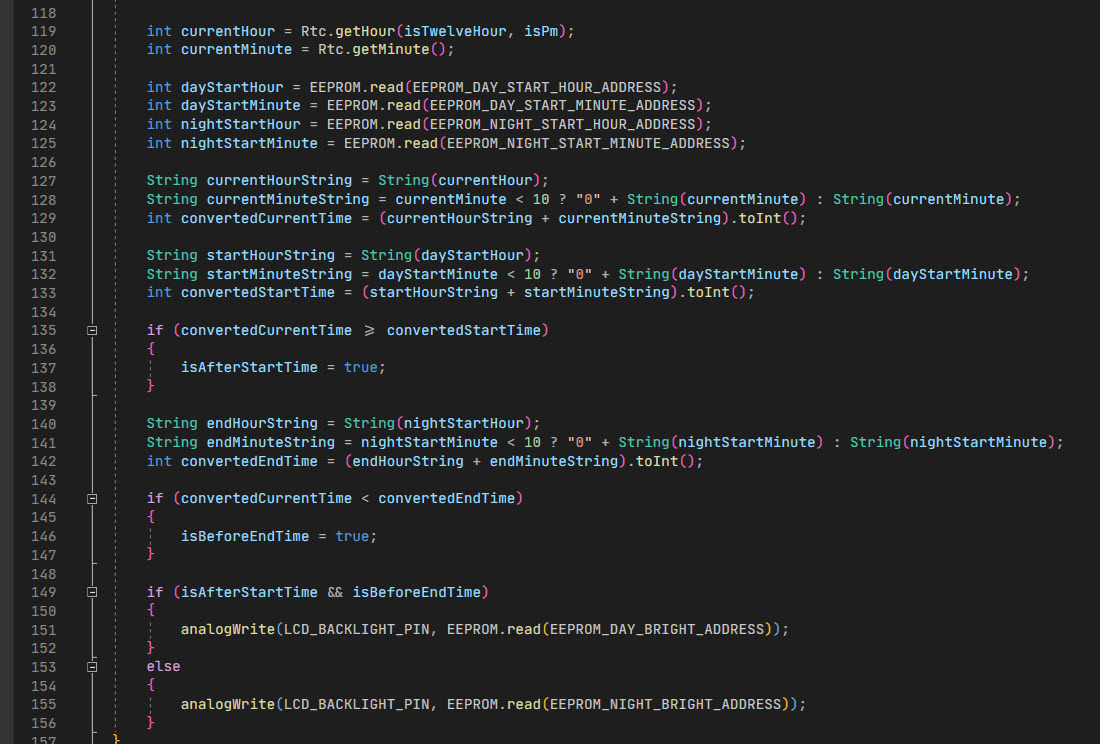
Arduino Source Code
So with no further faffing here’s a full listing of the source code for the Ardunio. I’ll put a download link at the end of the article so you can download all of the source code and the 0000.wav sound file all in a single zip file.
If you want to know more about how the Arduino source code works, checkout the video at the top of this article. In that I talk more about how the code is structured, how it works and how you can modify it.
|
1 2 3 4 5 6 7 8 9 10 11 12 13 14 15 16 17 18 19 20 21 22 23 24 25 26 27 28 29 30 31 32 33 34 35 36 37 38 39 40 41 42 43 44 45 46 47 48 49 50 51 52 53 54 55 56 57 58 59 60 61 62 63 64 65 66 67 68 69 70 71 72 73 74 75 76 77 78 79 80 81 82 83 84 85 86 87 88 89 90 91 92 93 94 95 96 97 98 99 100 101 102 103 104 105 106 107 108 109 110 111 112 113 114 115 116 117 118 119 120 121 122 123 124 125 126 127 128 129 130 131 132 133 134 135 136 137 138 139 140 141 142 143 144 145 146 147 148 149 150 151 152 153 154 155 156 157 158 159 160 161 162 163 164 165 166 167 168 169 170 171 172 173 174 175 176 177 178 179 180 181 182 183 184 185 186 187 188 189 190 191 192 193 194 195 196 197 198 199 200 201 202 203 204 205 206 207 208 209 210 211 212 213 214 215 216 217 218 219 220 221 222 223 224 225 226 227 228 229 230 231 232 233 234 235 236 237 238 239 240 241 242 243 244 245 246 247 248 249 250 251 252 253 254 255 256 257 258 259 260 261 262 263 264 265 266 267 268 269 270 271 272 273 274 275 276 277 278 279 280 281 282 283 284 285 286 287 288 289 290 291 292 293 294 295 296 297 298 299 300 301 302 303 304 305 306 307 308 309 310 311 312 313 314 315 316 317 318 319 320 321 322 323 324 325 326 327 328 329 330 331 332 333 334 335 336 337 338 339 340 341 342 343 344 345 346 347 348 349 350 351 352 353 354 355 356 357 358 359 360 361 362 363 364 365 366 367 368 369 370 371 372 373 374 375 376 377 378 379 380 381 382 383 384 385 386 387 388 389 390 391 392 393 394 395 396 397 398 399 400 401 402 403 404 405 406 407 408 409 410 411 412 413 414 415 416 417 418 419 420 421 422 423 424 425 426 427 428 429 430 431 432 433 434 435 436 437 438 439 440 441 442 443 444 445 446 447 448 449 450 451 452 453 454 455 456 457 458 459 460 461 462 463 464 465 466 467 468 469 470 471 472 473 474 475 476 477 478 479 480 481 482 483 484 485 486 487 488 489 490 491 492 493 494 495 496 497 498 499 500 501 502 503 504 505 506 507 508 509 510 511 512 513 514 515 516 517 518 519 520 521 522 523 524 525 526 527 528 529 530 531 532 533 534 535 536 537 538 539 540 541 542 543 544 545 546 547 548 549 550 551 552 553 554 555 556 557 558 559 560 561 562 563 564 565 566 567 568 569 570 571 572 573 574 575 576 577 578 579 580 581 582 583 584 585 586 587 588 589 590 591 592 593 594 595 596 597 598 599 600 601 602 603 604 605 606 607 608 609 610 611 612 613 614 615 616 617 618 619 620 621 622 623 624 625 626 627 628 629 630 631 632 633 634 635 636 637 638 639 640 641 642 643 644 645 646 647 648 649 650 651 652 653 654 655 656 657 658 659 660 661 662 663 664 665 666 667 668 669 670 671 672 673 674 675 676 677 678 679 680 681 682 683 684 685 686 687 688 689 690 691 692 693 694 695 696 697 698 699 700 701 702 703 704 705 706 707 708 709 710 711 712 713 714 715 716 717 718 719 720 721 722 |
// include the library code: #include <LiquidCrystal.h> #include <WTV020SD16P.h> #include <Keypad.h> #include <DS3231.h> #include <Wire.h> #include <PCF8574.h> #include <EEPROM.h> // initialize the library by associating any needed LCD interface pin // with the arduino pin number it is connected to const int rs = 4, en = 5, d4 = 6, d5 = 7, d6 = 8, d7 = 9; LiquidCrystal lcd(rs, en, d4, d5, d6, d7); // Constants to define the used pins. static const uint8_t resetPin = 10; // The pin number of the reset pin. static const uint8_t clockPin = 11; // The pin number of the clock pin. static const uint8_t dataPin = 12; // The pin number of the data pin. static const uint8_t busyPin = 13; // The pin number of the busy pin. static const int EEPROM_DAY_BRIGHT_ADDRESS = 0; static const int EEPROM_NIGHT_BRIGHT_ADDRESS = 1; static const int EEPROM_DAY_START_HOUR_ADDRESS = 2; static const int EEPROM_DAY_START_MINUTE_ADDRESS = 3; static const int EEPROM_NIGHT_START_HOUR_ADDRESS = 4; static const int EEPROM_NIGHT_START_MINUTE_ADDRESS = 5; // Instance of WTV020SD16P WTV020SD16P wtv020sd16p(resetPin, clockPin, dataPin, busyPin); RTClib RealTimeClock; DS3231 Rtc; PCF8574 I2CIoExtender(0x20); // I2C controlled digital IO extender for front LED int LCD_BACKLIGHT_PIN = 3; const byte ROWS = 4; //four rows const byte COLS = 3; //three columns char keys[ROWS][COLS] = { {'1','2','3'}, {'4','5','6'}, {'7','8','9'}, {'*','0','#'} }; byte rowPins[ROWS] = { A1, 0, 2, A3 }; //connect to the row pinouts of the keypad byte colPins[COLS] = { A2, A0, 1 }; //connect to the column pinouts of the keypad Keypad keypad = Keypad(makeKeymap(keys), rowPins, colPins, ROWS, COLS); unsigned long lastMilliCount; unsigned long splatKeyPressedMillisCount; bool splatKeyPressed = false; bool serialMode = false; String passwordString = "*******"; enum States { Initialising, EnterPassword, Countdown, Exploding, Configuring, Clock }; States state = Initialising; const int BEEP_SOUND = 0; const int TERRORISTS_WIN_SOUND = 1; const int KEY_PRESS_SOUND = 2; const int ABOUT_TO_BLOW_SOUND = 3; const int TIMES_UP_SOUND = 4; const int EXPLODE_SOUND = 5; const int C4_INITIATE_SOUND = 6; const int DEFUSING_USA_SOUND = 7; const int DEFUSED_SOUND = 8; const int DEFUSED_USA_SOUND = 9; const int COUNTER_TERRORISTS_WIN_SOUND = 10; void setup() { // Start the I2C interface Wire.begin(); // set up the LCD's number of columns and rows: lcd.begin(16, 2); pinMode(LCD_BACKLIGHT_PIN, OUTPUT); SetLCDBrightness(); wtv020sd16p.reset(); delay(600); keypad.setHoldTime(3000); ResetClockTimeout(); } void SetLCDBrightness() { // Determine if day or night... bool isAfterStartTime = false; bool isBeforeEndTime = false; bool isTwelveHour; bool isPm; int currentHour = Rtc.getHour(isTwelveHour, isPm); int currentMinute = Rtc.getMinute(); int dayStartHour = EEPROM.read(EEPROM_DAY_START_HOUR_ADDRESS); int dayStartMinute = EEPROM.read(EEPROM_DAY_START_MINUTE_ADDRESS); int nightStartHour = EEPROM.read(EEPROM_NIGHT_START_HOUR_ADDRESS); int nightStartMinute = EEPROM.read(EEPROM_NIGHT_START_MINUTE_ADDRESS); String currentHourString = String(currentHour); String currentMinuteString = currentMinute < 10 ? "0" + String(currentMinute) : String(currentMinute); int convertedCurrentTime = (currentHourString + currentMinuteString).toInt(); String startHourString = String(dayStartHour); String startMinuteString = dayStartMinute < 10 ? "0" + String(dayStartMinute) : String(dayStartMinute); int convertedStartTime = (startHourString + startMinuteString).toInt(); if (convertedCurrentTime >= convertedStartTime) { isAfterStartTime = true; } String endHourString = String(nightStartHour); String endMinuteString = nightStartMinute < 10 ? "0" + String(nightStartMinute) : String(nightStartMinute); int convertedEndTime = (endHourString + endMinuteString).toInt(); if (convertedCurrentTime < convertedEndTime) { isBeforeEndTime = true; } if (isAfterStartTime && isBeforeEndTime) { analogWrite(LCD_BACKLIGHT_PIN, EEPROM.read(EEPROM_DAY_BRIGHT_ADDRESS)); } else { analogWrite(LCD_BACKLIGHT_PIN, EEPROM.read(EEPROM_NIGHT_BRIGHT_ADDRESS)); } } void SetLCDBrightness(int brightness) { analogWrite(LCD_BACKLIGHT_PIN, brightness); } unsigned long clockTimeoutTimeElapsed; int clockTimeoutMillis = 30000; void ResetClockTimeout() { clockTimeoutTimeElapsed = millis(); } void DoInitialisationSequence() { // Print a message to the LCD. LcdPrintLeftJustified("Bang-OMatic 5000"); delay(2000); LcdPrintLeftJustified("Have nice day!"); delay(2000); PlaySoundAsync(C4_INITIATE_SOUND); RedLed(true); delay(100); RedLed(false); delay(100); GreenLed(true); delay(100); GreenLed(false); LcdPrintLeftJustified(" *******"); passwordString = "*******"; state = EnterPassword; ResetCountdownRegisters(); } void loop() { // Once we're in config mode the keypad is ignored. To exit config mode // the user restarts the device. if (state == Configuring) { return; } if (state == Initialising) { DoInitialisationSequence(); } if (keypad.getKeys()) { for (int i = 0; i < LIST_MAX; i++) // Scan the whole key list. { if (keypad.key[i].stateChanged) // Only find keys that have changed state. { switch (keypad.key[i].kstate) { // Report active key state : IDLE, PRESSED, HOLD, or RELEASED case PRESSED: PlaySoundAsync(KEY_PRESS_SOUND); ResetClockTimeout(); if (state == Countdown) { DefuseBomb(); return; } if (state == Clock) { state = Initialising; return; } AddCharacterToPassword(keypad.key[i].kchar); break; case HOLD: break; case RELEASED: break; case IDLE: break; } if (keypad.key[i].kstate == HOLD && keypad.key[i].kchar == '*') { Serial.begin(9600); state = Configuring; LcdPrintLeftJustified("USB MODE ENABLED"); } } } } if (state == Countdown) { ResetClockTimeout(); DoCountdown(); } if (state == Exploding) { ResetClockTimeout(); DoExploding(); } // After 30 seconds we timeout and become a clock... if (millis() > clockTimeoutTimeElapsed + clockTimeoutMillis) { state = Clock; } if (state == Clock) { DoClock(); } lastMilliCount = millis(); } void DefuseBomb() { delay(500); LcdPrintLeftJustified("Defusing."); delay(500); PlaySoundAsync(DEFUSING_USA_SOUND); LcdPrintLeftJustified("Defusing.."); delay(1000); LcdPrintLeftJustified("Defusing..."); delay(1000); LcdPrintLeftJustified("Defusing...."); delay(1000); LcdPrintLeftJustified("Defusing....."); delay(1000); PlaySoundAsync(DEFUSED_SOUND); delay(1500); LcdPrintLeftJustified("BombOS v2.1"); delay(1500); LcdPrintLeftJustified(" -=SAFE MODE=-"); PlaySoundAsync(DEFUSED_USA_SOUND); delay(2800); PlaySoundAsync(COUNTER_TERRORISTS_WIN_SOUND); LcdPrintLeftJustified("CT Win!"); delay(5000); state = Clock; } unsigned long clockDisplayTimeElapsed; void DoClock() { String time = ""; // Write time to display... if (millis() > clockDisplayTimeElapsed + 1000) { clockDisplayTimeElapsed = millis(); DateTime now = RealTimeClock.now(); int hour = now.hour(); if (hour < 10) { time += "0"; } time += hour; time += ":"; int minute = now.minute(); if (minute < 10) { time += "0"; } time += minute; time += ":"; int second = now.second(); if (second < 10) { time += "0"; } time += second; LcdPrintLeftJustified(" " + time); // Handle day or night mode LCD brightness... SetLCDBrightness(); } } void PlaySoundAsync(int fileNumber) { wtv020sd16p.asyncPlayVoice(fileNumber); } unsigned long countdownTimeElapsed; int countDownHundredths = 100; int countDownSeconds = 40; void DoCountdown() { if (millis() > countdownTimeElapsed + 50) { countdownTimeElapsed = millis(); // Update display... String time = "00:"; if (countDownSeconds < 10) { time += "0"; } time += countDownSeconds; time += ":"; // Just print random numbers for the hundredths, they're too quick to read anyway... time += random(9); time += random(9); LcdPrintTime(time); // Count down hundredths and seconds (steps of 5 hundredths) countDownHundredths -= 5; if (countDownSeconds <= 0) { //BOOM! state = Exploding; LcdPrintTime("00:00:00"); return; } if (countDownHundredths <= 0) { countDownSeconds--; countDownHundredths = 100; } } FlashRedLedAndBeep(countDownSeconds); } void DoExploding() { GreenLed(true); PlaySoundAsync(ABOUT_TO_BLOW_SOUND); delay(1500); PlaySoundAsync(TIMES_UP_SOUND); delay(1200); LcdPrintLeftJustified(" WARRANTY VOID!"); PlaySoundAsync(EXPLODE_SOUND); delay(4000); LcdPrintLeftJustified("Terrorists win!"); PlaySoundAsync(TERRORISTS_WIN_SOUND); ResetCountdownRegisters(); // for next time delay(5000); GreenLed(false); state = Clock; } unsigned long flashRedLedAndBeepTimeElapsed; int flashRedLedAndBeepIntervalMillis = 1000; unsigned long flashRedLedTimeElapsed; int flashRedLedIntervalMillis = 50; bool redLedIsOn = false; void FlashRedLedAndBeep(int currentTimeSeconds) { // See if it's time for a beep? if (millis() > flashRedLedAndBeepTimeElapsed + flashRedLedAndBeepIntervalMillis) { // Limit the final speed so it doesn't beep too fast! if (flashRedLedAndBeepIntervalMillis > 185) { flashRedLedAndBeepIntervalMillis -= 12; } flashRedLedAndBeepTimeElapsed = millis(); redLedIsOn = true; RedLed(true); flashRedLedTimeElapsed = millis(); PlaySoundAsync(BEEP_SOUND); } // Handle turning red led off after flash elapsed if (redLedIsOn) { if (millis() > flashRedLedTimeElapsed + flashRedLedIntervalMillis) { RedLed(false); redLedIsOn = false; } } } void ResetCountdownRegisters() { countDownHundredths = 100; countDownSeconds = 40; flashRedLedAndBeepIntervalMillis = 1000; } void RedLed(bool on) { if (on) { I2CIoExtender.write(0, LOW); I2CIoExtender.write(1, HIGH); } else { I2CIoExtender.write(0, HIGH); I2CIoExtender.write(1, HIGH); } } void GreenLed(bool on) { if (on) { I2CIoExtender.write(0, HIGH); I2CIoExtender.write(1, LOW); } else { I2CIoExtender.write(0, HIGH); I2CIoExtender.write(1, HIGH); } } String previousString = ""; void LcdPrintLeftJustified(String string) { if (string == previousString) { return; } lcd.clear(); int row = 0; int colModifier = 0; for (int i = 0; i < string.length(); i++) { lcd.setCursor(i - colModifier, row); lcd.print(string[i]); if (i >= 7) { row++; colModifier = 8; } } previousString = string; } void AddCharacterToPassword(char character) { passwordString = passwordString.substring(1); // Removes leftmost char passwordString += character; PrintPassword(); if (passwordString == "7355608") //if (passwordString == "******1") { // Start countdown! state = Countdown; } } void PrintPassword() { LcdPrintLeftJustified(" " + passwordString); } String previousTimeString = ""; void LcdPrintTime(String string) { if (string == previousTimeString) { return; } for (int i = 0; i < string.length(); i++) { lcd.setCursor(i, 1); lcd.print(string[i]); } previousTimeString = string; } void serialEvent() { while (Serial.available()) { ParseSerialMessage(Serial.readString()); } } void(*resetFunc) (void) = 0; void ParseSerialMessage(String message) { // First get command int delimiterIndex = message.indexOf(':'); // 3 String command = message.substring(0, delimiterIndex); int commandLength = command.length(); // 3 for LCD int messageLength = message.length(); // 8 for LCD:123 String value = message.substring(delimiterIndex + 1, messageLength - 1); if (command == "LCD") { SetLCDBrightness(value.toInt()); } if (command == "GET_LCD_DAY") { Serial.println(EEPROM.read(EEPROM_DAY_BRIGHT_ADDRESS)); } if (command == "GET_LCD_NIGHT") { Serial.println(EEPROM.read(EEPROM_NIGHT_BRIGHT_ADDRESS)); } if (command == "SET_LCD_DAY") { EEPROM.write(EEPROM_DAY_BRIGHT_ADDRESS, value.toInt()); Serial.println("ACK:"); } if (command == "SET_LCD_NIGHT") { EEPROM.write(EEPROM_NIGHT_BRIGHT_ADDRESS, value.toInt()); Serial.println("ACK:"); } if (command == "SET_DAY_START_HOUR") { EEPROM.write(EEPROM_DAY_START_HOUR_ADDRESS, value.toInt()); Serial.println("ACK:"); } if (command == "SET_DAY_START_MINUTE") { EEPROM.write(EEPROM_DAY_START_MINUTE_ADDRESS, value.toInt()); Serial.println("ACK:"); } if (command == "SET_NIGHT_START_HOUR") { EEPROM.write(EEPROM_NIGHT_START_HOUR_ADDRESS, value.toInt()); Serial.println("ACK:"); } if (command == "SET_NIGHT_START_MINUTE") { EEPROM.write(EEPROM_NIGHT_START_MINUTE_ADDRESS, value.toInt()); Serial.println("ACK:"); } if (command == "SET_HOUR") { Rtc.setHour(value.toInt()); Serial.println("ACK:"); } if (command == "GET_HOUR") { bool isTwelveHour; bool isPm; Serial.println(Rtc.getHour(isTwelveHour, isPm)); } if (command == "SET_MINUTE") { Rtc.setMinute(value.toInt()); Serial.println("ACK:"); } if (command == "GET_MINUTE") { Serial.println(Rtc.getMinute()); } if (command == "GET_DAY_START_HOUR") { Serial.println(EEPROM.read(EEPROM_DAY_START_HOUR_ADDRESS)); } if (command == "GET_DAY_START_MINUTE") { Serial.println(EEPROM.read(EEPROM_DAY_START_MINUTE_ADDRESS)); } if (command == "GET_NIGHT_START_HOUR") { Serial.println(EEPROM.read(EEPROM_NIGHT_START_HOUR_ADDRESS)); } if (command == "GET_NIGHT_START_MINUTE") { Serial.println(EEPROM.read(EEPROM_NIGHT_START_MINUTE_ADDRESS)); } if (command == "REBOOT") { resetFunc(); } } |
With the above source code you should be able to load it up in your favourite IDE and upload it to the Arduino in the CS:GO C4 Prop.
You will need to have the following external code libraries installed in order for the code to be able to talk to the various hardware modules. You can install the libraries using the Arduino IDE Library Manager, search for them by their Library Name.
| LIBRARY NAME | TALKS TO | AUTHOR | VERSION |
|---|---|---|---|
| LiquidCrystal | LCD Display | Ardunio (Built into IDE) | 1.0.7 |
| WTV020SD16P | “Mp3 pLaYer” | Diego J. Arevalo | 1.4 |
| Keypad | Keypad | Mark Stanley, Alexander Brevig | 3.1 |
| DS3231 | Real Time Clock | Andy Wickert | 1.0.2 |
| PCF8574 | I2C GPIO Expander | Rob Tillaart | 0.2.4 |
| EEPROM | Arduino EEPROM | Ardunio (Built into IDE) | n/a |
The author names and versions have been included to help you know that you have the correct library. The versions probably won’t matter but just in case you have any problems I have listed the versions that I used.
The CS:GO C4 Configurator
If you have been following along with the series you will probably know that the CS:GO C4 Prop doubles up as a bedside clock after 30 seconds of inactivity.
And being a clock, you will need a way of setting the time. This is where the CS:GO C4 Configurator Application comes in as it allows you to configure the CS:GO Prop via its USB Port in the rear of the device.
I’m not going to list the source code for the CS:GO C4 Configurator here as it’s a number of files and it wouldn’t really help you much to see the code here. The source code for the Desktop Application will be included in the zip file at the end of the article. You can load it up in Visual Studio to build it and run it.
To configure the CS:GO Prop, run the CS:GO C4 Configurator application. Don’t plug the CS:GO Prop into the USB port just yet.
Choose a COM Port and click the Connect button.
Next you will be asked to plug the CS:GO Prop into a USB Port on your PC.

Next you will be asked to wait until the CS:GO Prop boots to the password screen, click the OK button and when the CS:GO Prop gets to the password screen, press and hold the * key on the prop for at least 3 seconds.
The prop will now go into USB Mode:
After a few seconds, the Configurator will load all the settings for the CS:GO Prop and display them as follows:
As well as being able to set the current time, you can set a daytime and a nighttime brightness for the LCD display. If you’re going to use this as a bedside clock you want the LCD to be dim while you are sleeping and brighter during daylight hours.
The Daytime Brightness value will be applied after the Daytime Begins time, and the Nighttime Brightness will be applied after the Nighttime begins time.
You can test the brightness of each by clicking the Test button.
Click Save to save your changes.
Final Thoughts
There are loads of options for customising the CS:GO C4 Prop even further…
If I had time I would have liked to added an alarm clock facility so that it could be used as a bedside alarm clock. The Real Time Clock module has the facility to be able to set alarms so it wouldn’t be too difficult to do.
It would also be possible to code in a daylight savings time feature so that if your country follows daylight savings time, the clock will automatically adjust itself with the seasons.
If you wanted to use the prop for Airsoft scenarios, you could consider adding in a small audio amplifier and a bigger speaker so that the prop sounds are a lot louder. It’d be really cool to play CS:GO Defuse the Bomb with real BBs.
Before we conclude the series and I leave you with the download link for the software assets I’d like to say a big thank you for following along with the series. A special thanks to all that have supported me on YouTube by liking my videos and subscribing to the channel and also to all of you that take the time to leave comments and ask questions.
Finally, have fun! If you find any errors in the information here comment below or leave a comment on the YouTube video and I’ll make corrections to this web page.
downloads
The files below are free to download and use, if you enjoy them and want to support the channel and help me to make more great content feel free to hit the “Buy me a Beer” links on the right or at the bottom of the page, or head over and join my Patreon.
Below you can download the source code and beep wav file for the CS:GO C4 Game Prop…
Source Code Files (139kb)
A ZIP file containing all the source code for the Arduino, the source code and executable for the configurator and the 0000.wav beep sound for the project.